While your musical creativity may have no limits, unfortunately your device does. If you’re loading up multiple instances of a complex synth or piling on tons of plugins and effects, it won’t be long before your device just can’t take any more. This limit depends on the CPU of the device. The better the processor is, the more your device will be able to handle. But every device has its limit and once you cross that threshold the result is the same: crackling audio, apps freezing and crashing and generally slow performance.
But thankfully, it doesn’t have to be this way. So without further ado, here are our top tips for avoiding CPU issues without having to splash out on a brand new iPad.
Close Everything Else
Your first port of call is to make sure that you’ve only got the essential apps open, this means your DAW and any other music apps that you’re actually using right now. Having Facebook, Google Maps, Instagram and thirty-odd Safari tabs open is just putting your device under an unnecessary amount of strain. Having other apps open is more likely to distract you and stop you from actually spending time working on your music. So close any unnecessary apps and keep them closed!
Delete What You Don’t Need
Once you’ve closed any apps that you aren’t using, the next step is to go in to your actual project and the trim the fat from there. The chances are you’ll probably have empty tracks and plugins that you’ve loaded up but you aren’t using any more. If so, you may as well do a bit of a spring clean and get rid of them, all they’re really doing at this point is cluttering up your project and making your device run slower.

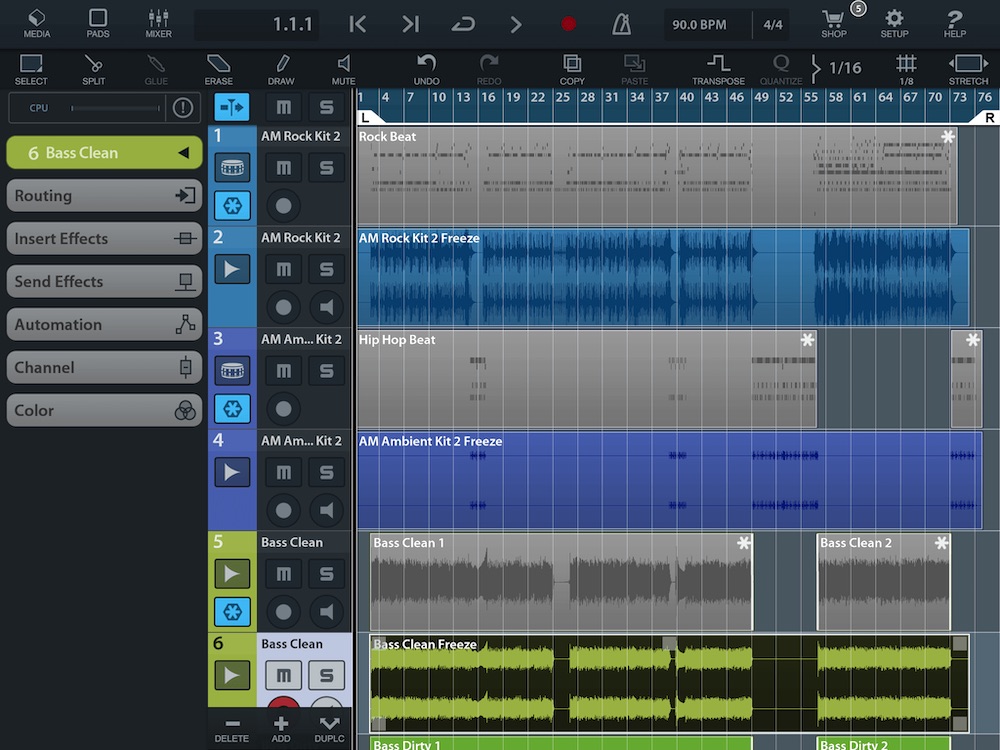
Bounce Your Tracks to Audio
If you’ve tried the last two steps and are still having issues with overloading your device’s CPU then you’re probably going to want to take some slightly more drastic measures.
Using MIDI to sequence a synth plug-in is always going to be heavier on the processor than just playing back an audio file. So once you’ve finished tweaking your synth patch then you may as well just bounce it down to an audio file. However this does have a downside, once you’ve bounced to audio, you’ve committed to that sound, it’s not quite so easy to make any changes. But as long as you haven’t deleted the original instrument track you can go back, make any tweaks and then re-bounce the audio.
This can be a bit of hassle so some DAWs, such as Cubasis, have a built in ‘freeze’ function. This is often in the form of a button on the track header of each channel. This is essentially the same as bouncing the track to audio, so you can’t make any changes to the frozen track. But by turning the freeze mode off, your track reverts to its original state and you can make changes there. In Cubasis, the tapping the freeze button creates an audio file of the track below the original track.
Use Effects as Sends Instead of Inserts
Often, a major cause of the CPU overloading is simply having too many CPU heavy effect plugins loaded. Reverb plugins in are a common culprit. This is why they’re often used as send effects instead of insert effects.
So what’s the difference? Well an insert effect is placed directly on the channel you want affected, so it will only affect whatever is on that channel. Send effects, on the other hand, are on a channel of their own and signal from any instrument channels are sent to them. So for example, you might want your vocals to have a bit of reverb, so you send some signal from your vocal track to your reverb channel. The more signal you send, the more reverb you hear on your vocals. The major advantage of working like this is that you can send signal from all different channels to the reverb channel, and they can share the same effect. So instead of loading up a new reverb for every single track, you can just load up a single instance of your reverb and have that provide the effect for all of the tracks in the project.
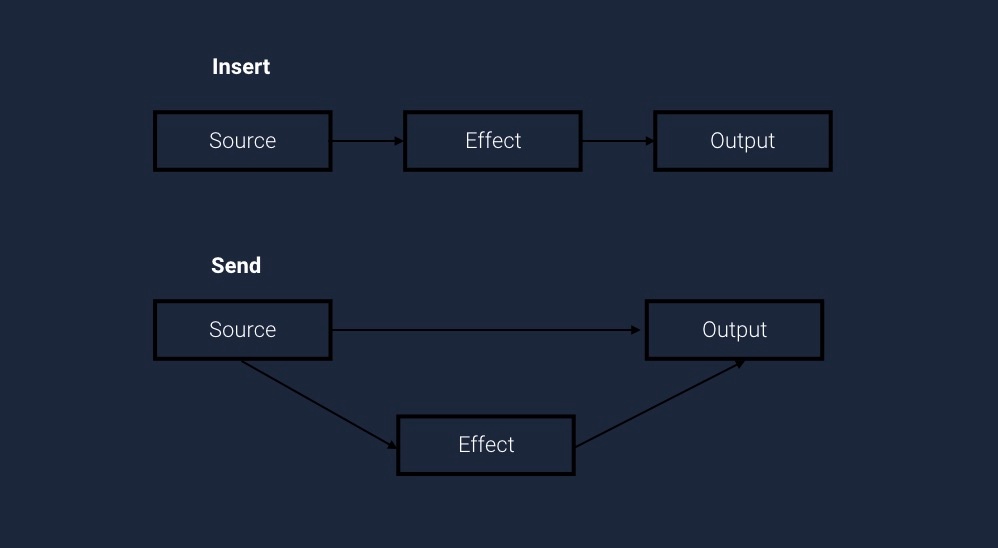
Now not every plugin is going to work as a send effect, for the majority of plugins you’ll still be using them as insert effects. But both reverb and delay are pretty commonly used as send effects, as aside from being kinder on your CPU, having all of your instruments share the same reverb and delay settings makes them feel as though they’re in the same physical space. However, don’t feel limited to just using these kind of effects as sends. For example, if you’re using the same chorus plugin with the same setting on more than one track, why not use it as a send effect instead?
Increase Your Buffer Size
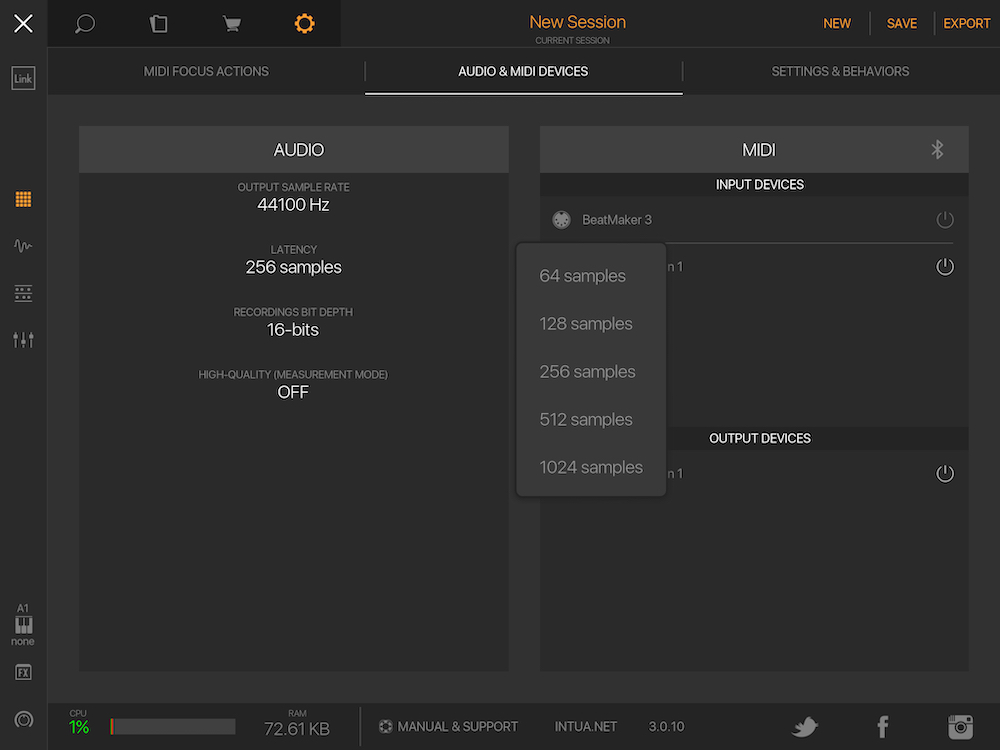
The final way that you can deal with CPU problems is by changing your DAW’s buffer size. Increasing the buffer size will be less intensive on your CPU. However, the downside of this is that more latency is introduced as you increase the buffer size. If you’re tracking instruments then this is going to cause some problems, so you’ll want to keep the buffer size pretty low. You can normally raise the buffer size to about 256 samples without noticing much latency. But if you’ve finished recording and you’re just mixing your track or working on sound design, then a bit of latency isn’t going to make any difference at all, so you may as well turn the buffer size all the way up.
There’s nothing quite as frustrating as having your music making apps running at a snail’s pace when you’re in a creative flow. But with these tips you should have everything you need to ensure your sessions stay creative and run smoothly. Although, if you’ve tried all of these steps and your device is still struggling, then you might have to consider upgrading.